
# Profile Trend
When clicking the "Profile trend" button on the project detail screen, it will be shown a menu related to "Profile Trend".

List of functions shown in the menu
| No. | Functions | Descriptions |
|---|---|---|
| 1 | Create Profile trend | Creating a "Profile Trend" according to the settings. |
| 2 | Check/edit Profile trend (*1) | Check and edit the created "Profile Trend". |
| 3 | Download (*1) | Downloading the created "Profile Trend" into SMARTDAC+. |
*1 Will be shown after creating a "Profile Trend".
# Create a Profile trend
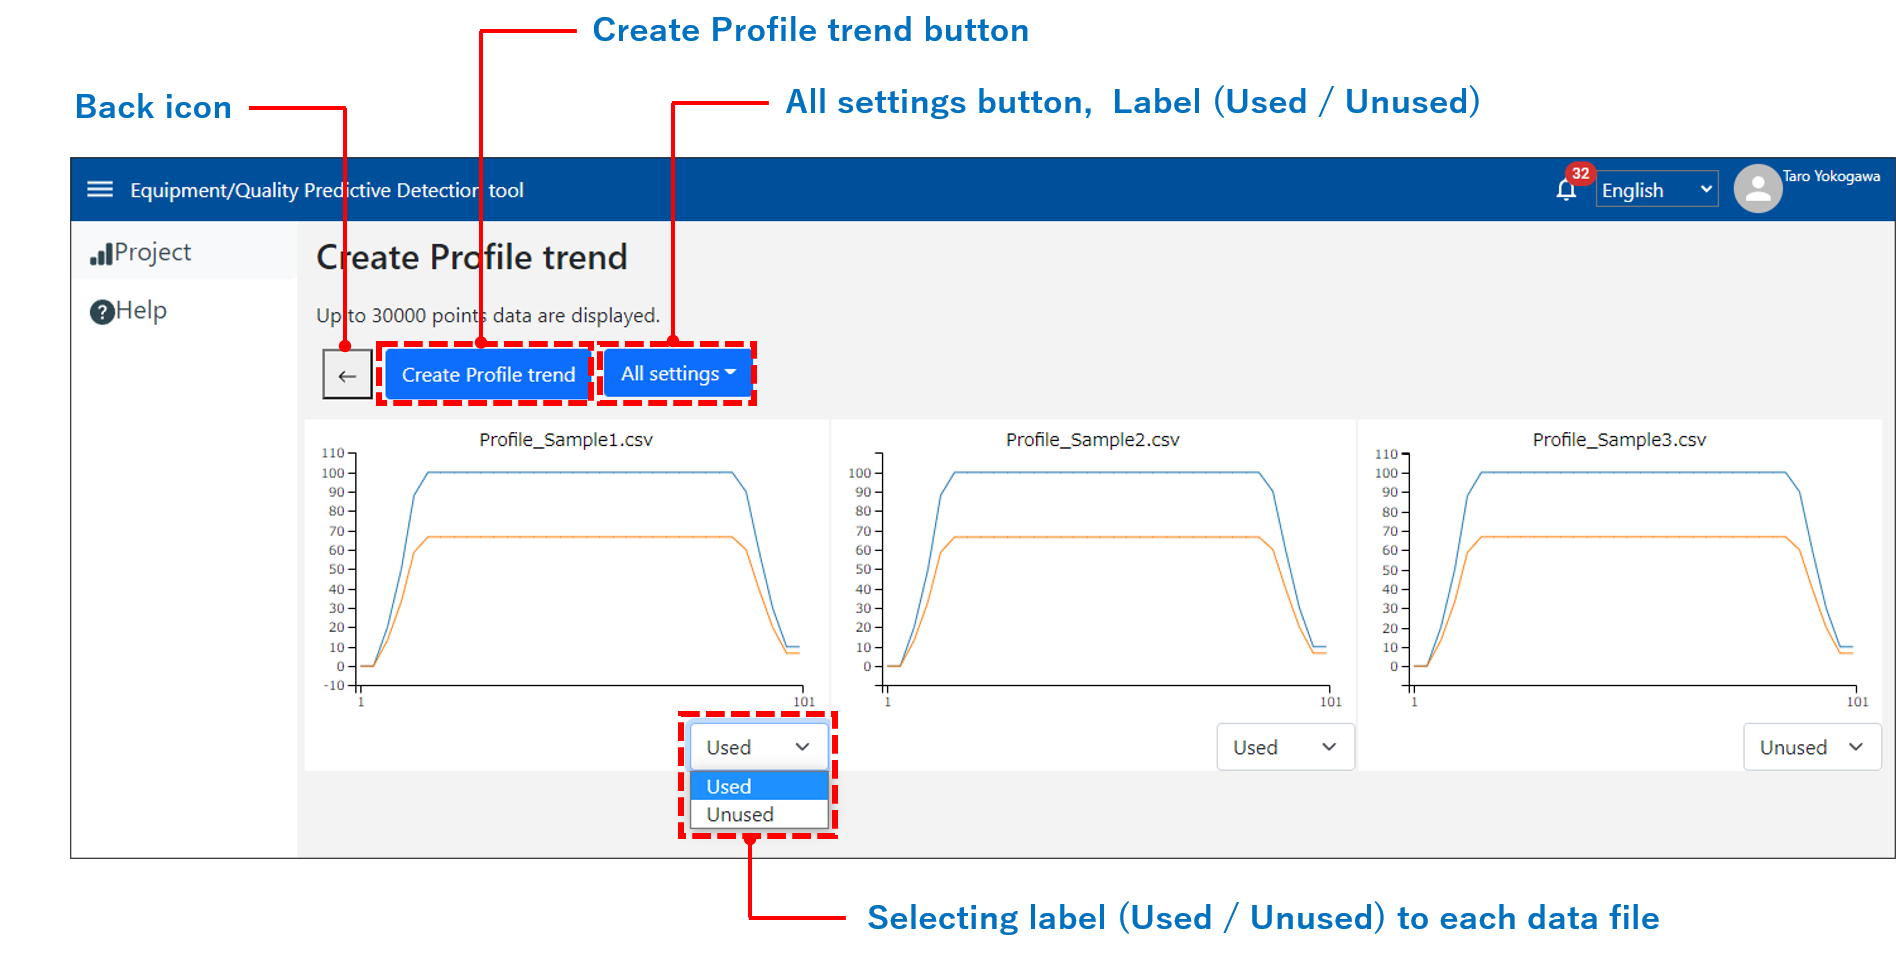
By clicking the "Create Profile trend" in the menu, you will be moved to the screen for creating a "Profile Trend".
By clicking the "Back" icon, you can go back to the project detail page. (Same as "Check/Edit the Profile trend" described later.)
To create a "Profile Trend", select a Used or Unused label to each data file. (The unused labeled data file is not used as the source data for creating the "Profile Trend".)
By using the "All settings" button, you can select Used/Unused label settings for all data files at once.
Note:
- To create the "Profile Trend", at least one or more "Used" data are required.
After labeling "Used", the "Create Profile trend" button will be displayed. - Data files that can be used to create the "Profile Trend" are those with data points of 30,000 or less for each channel.
Data files with more than 30,000 points will not be displayed on the screen for creating the "Profile Trend". - If the number of uploaded data files or the number of channels of uploaded data files is large, the tool operation may be slow.
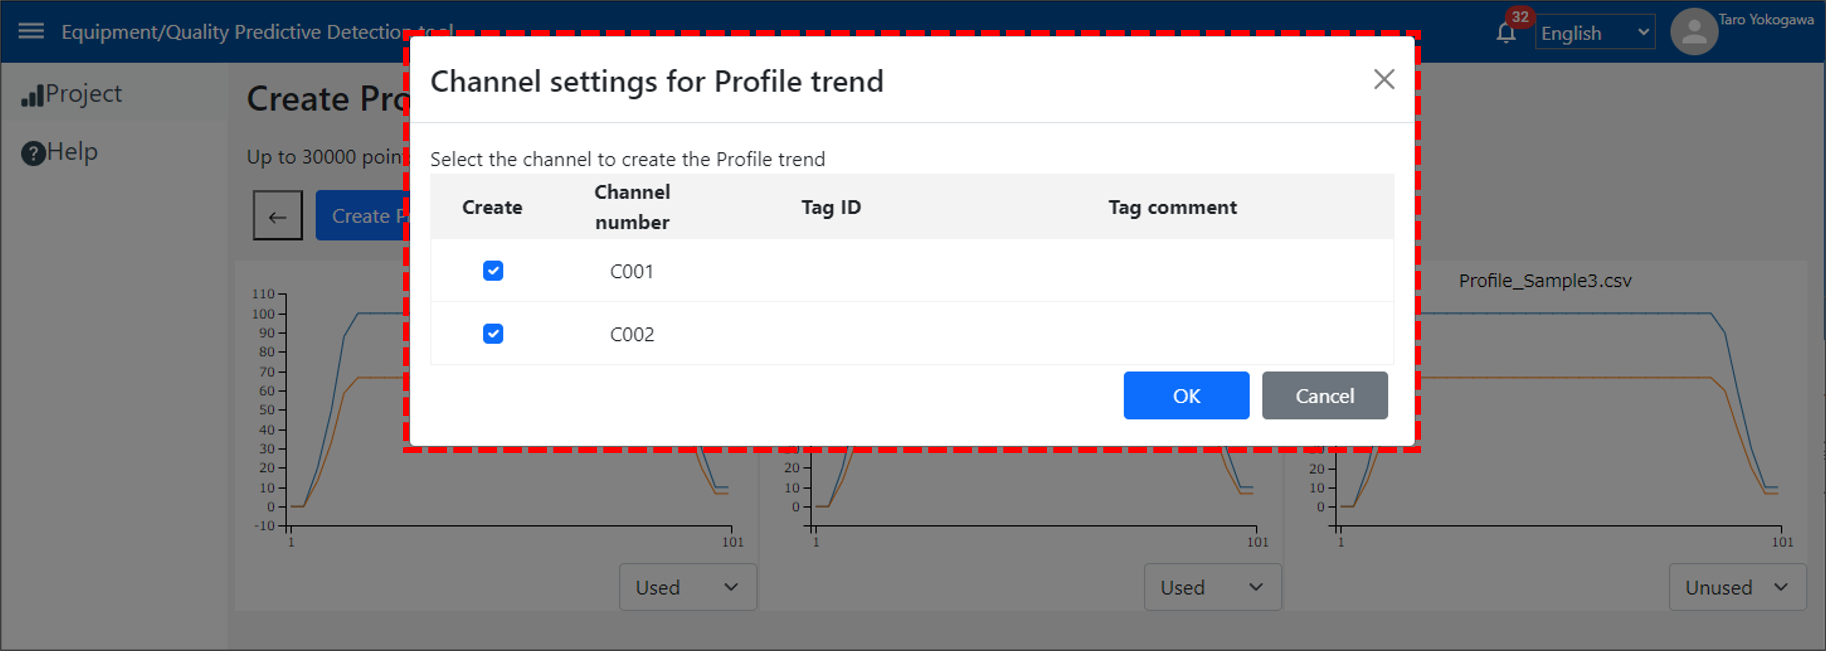
After selecting Used/Unused, by clicking the "Create Profile trend" button, it will be shown the channel setting dialog.
In this dialog, select channel numbers for creating "Profile Trend" and click OK.
Note:
- The number of channels for creating the "Profile Trend" can be selected up to 20 channels.
- It will be displayed only the common channel numbers among the data files which are selected as "Used". For example, "Data File #1" has 0001, 0002, and 0003 channels and "Data File #2" has 0001, 0002, and 0004 channels, only 0001 and 0002 channels, which are common numbers between both files, will be displayed.
- "Profile Trend" will be created on each channel respectively.
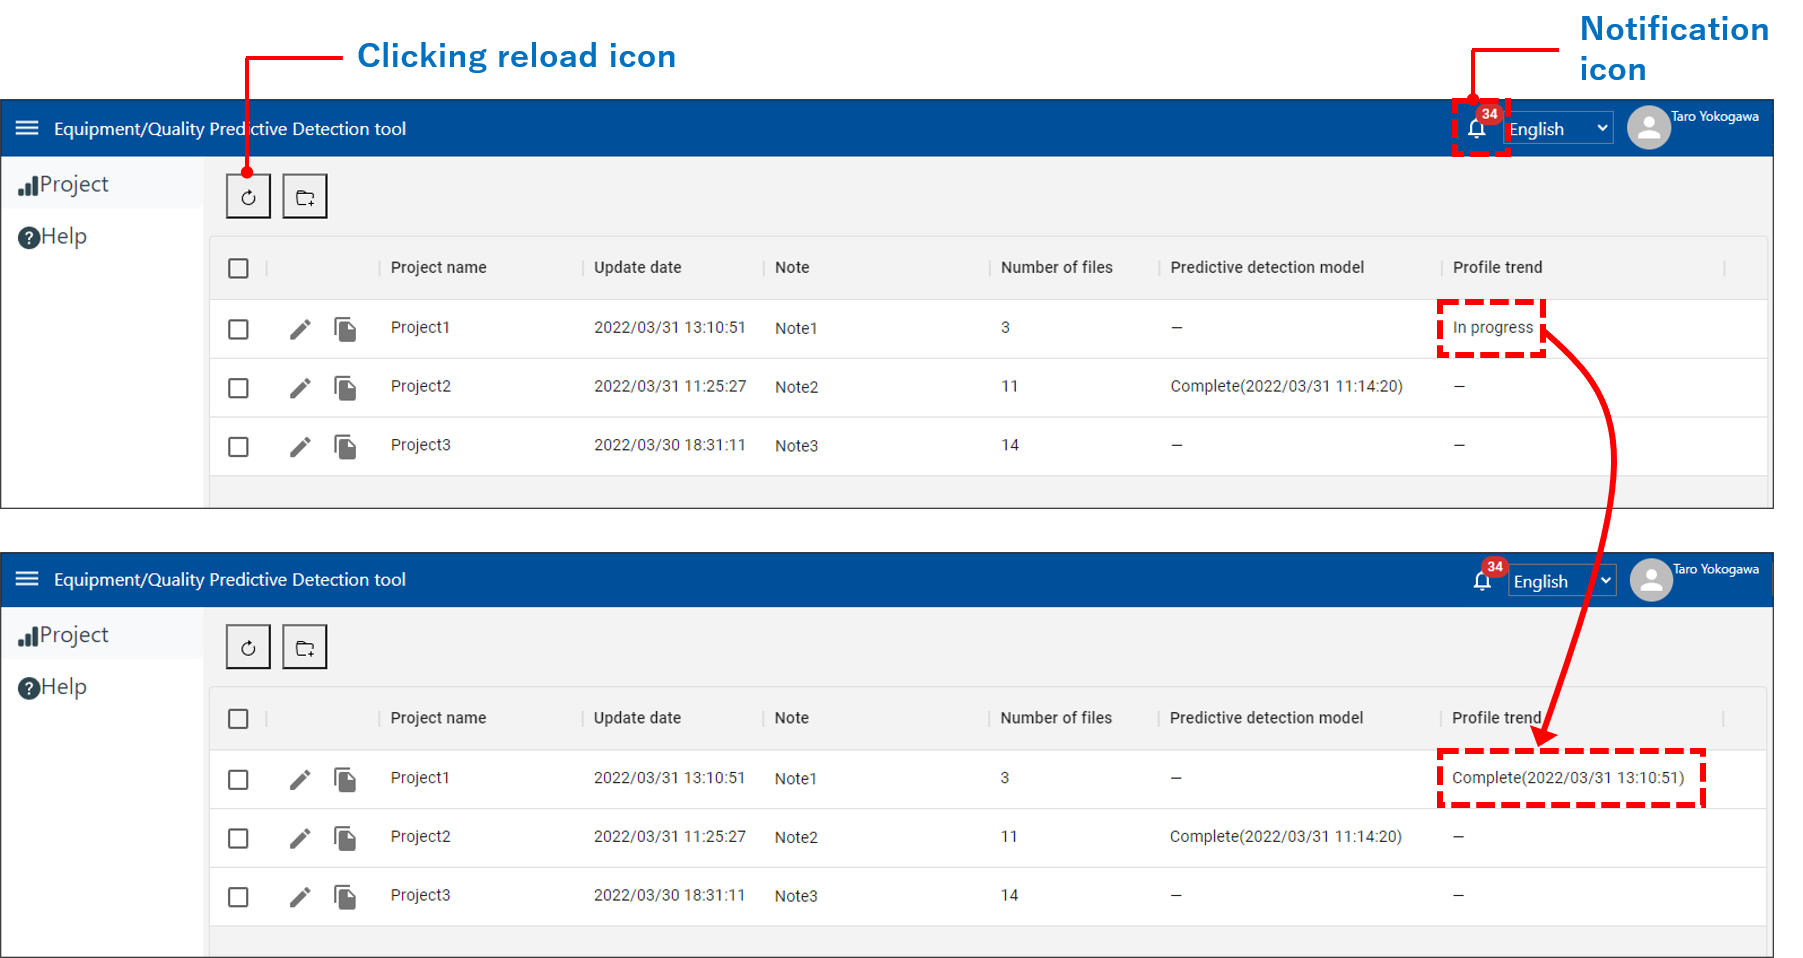
After clicking the OK button in the dialog, it will be back to the project list page, and shown "in progress" on the status of "Profile Trend" in the project.
Please wait until showing the notification for the completion of creating a "Profile Trend" in the Notification.
By clicking the "Reload" icon after notification for the completion of creating a "Profile Trend", the status of the project will be "Complete (Completion date and time)".
Note:
Up to 1 "Profile Trend" can be saved in a single project.
If creating a new "Profile Trend" in the same project, the existed "Profile Trend" will be overwritten.
# Check/Edit the Profile trend
By clicking the "Check/edit Profile trend" on the menu, it will be shown a check/edit screen for "Profile Trend".
In this screen, you can check the list of the created "Profile Trend" for each channel.

Note:
If the number of data points or channels of the created "Profile Trend" is large, the tool operation may be slow.
# Enlarging the graph
When clicking the "Profile Trend" for each channel, it will be shown the enlarged graph of the selected "Profile Trend".
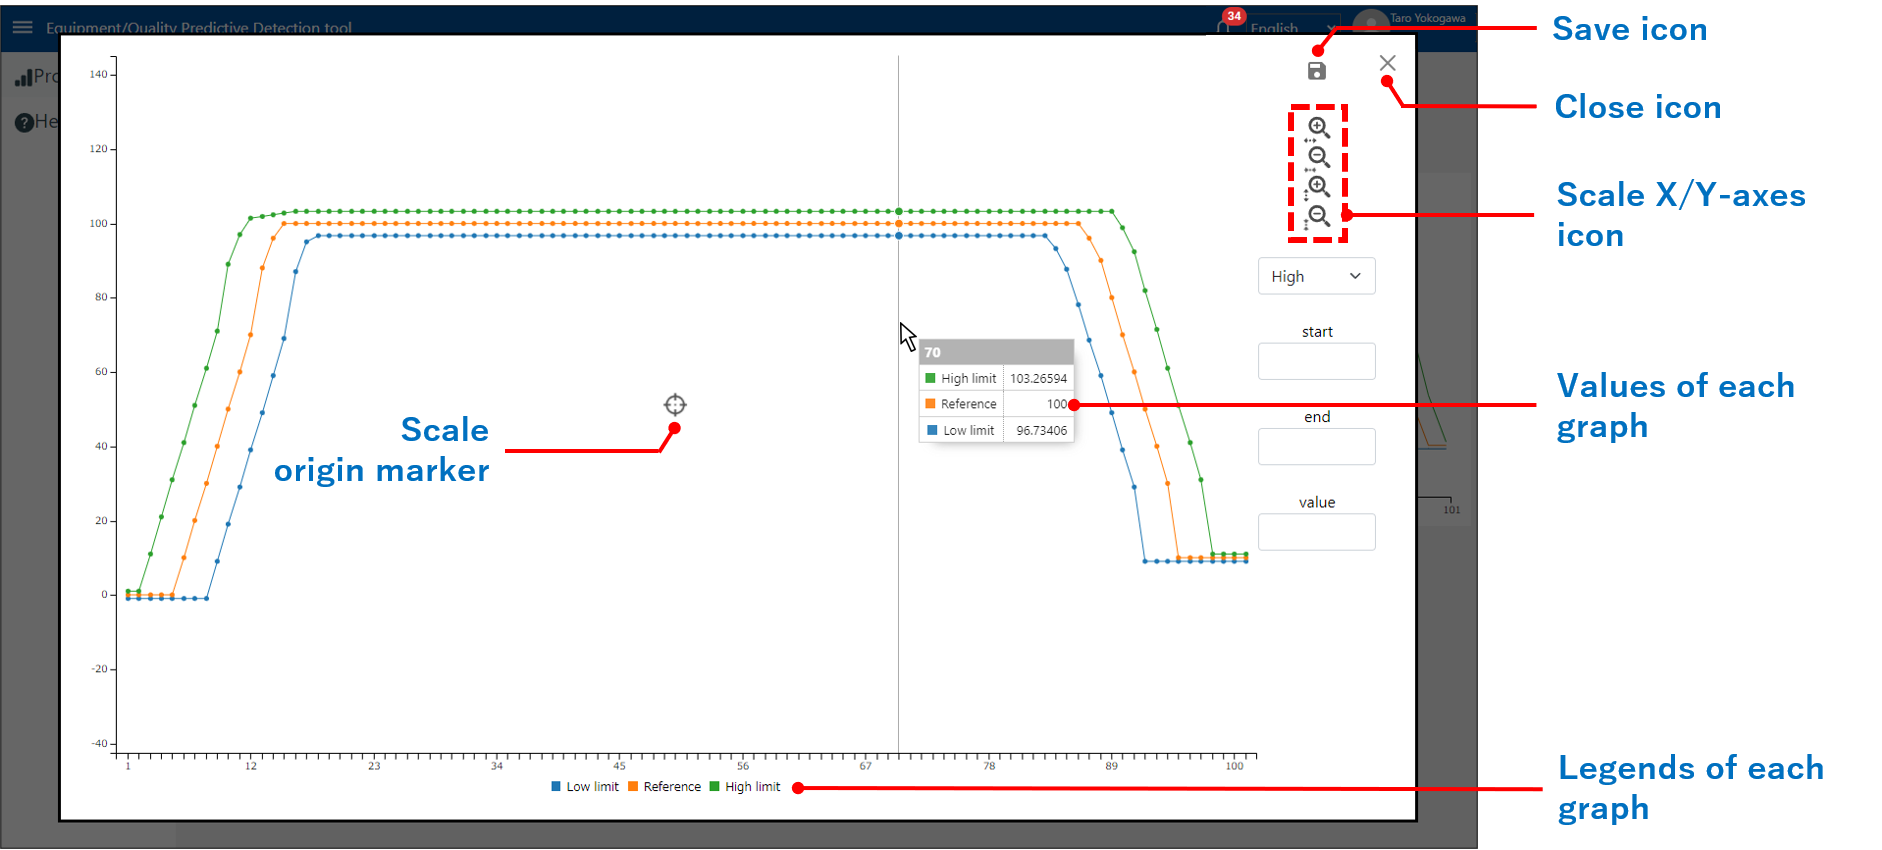
In the state of showing the enlarged graph, when clicking the "Close" icon, you can go back to the "Profile Trend" list page.
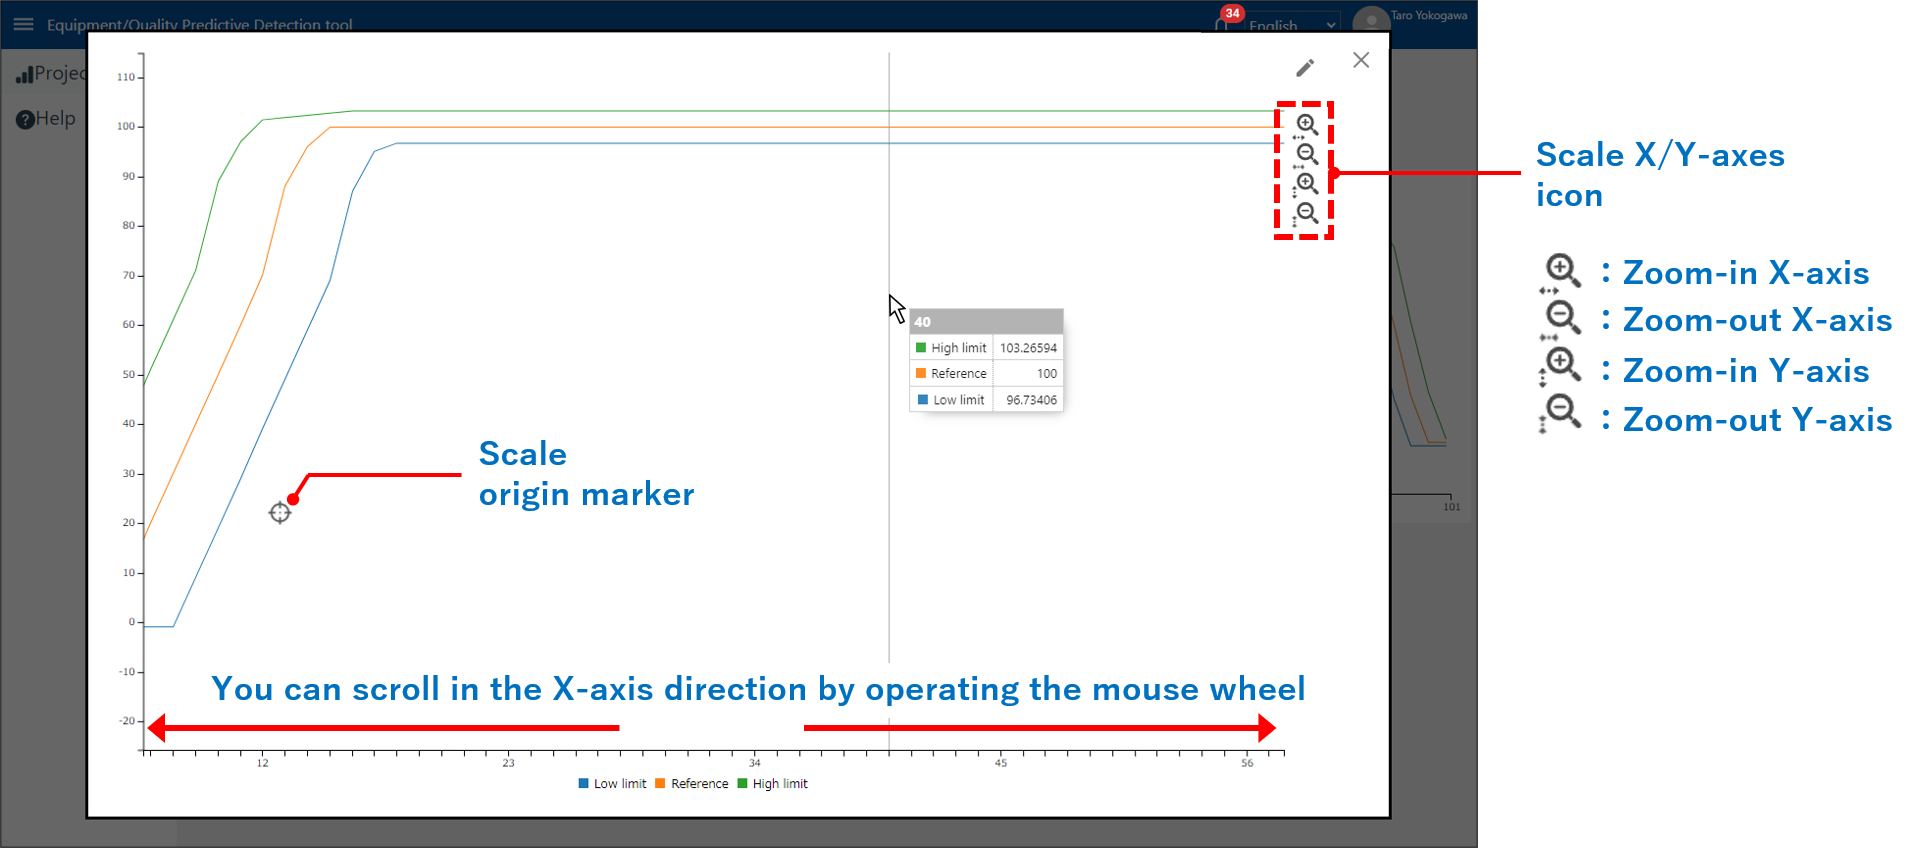
By hovering the mouse cursor over the graph, it will be shown each value (High limit / Reference / Low limit) of "Profile Trend".
By clicking legends of the graph, you can switch to display/hide the graphs and their values.
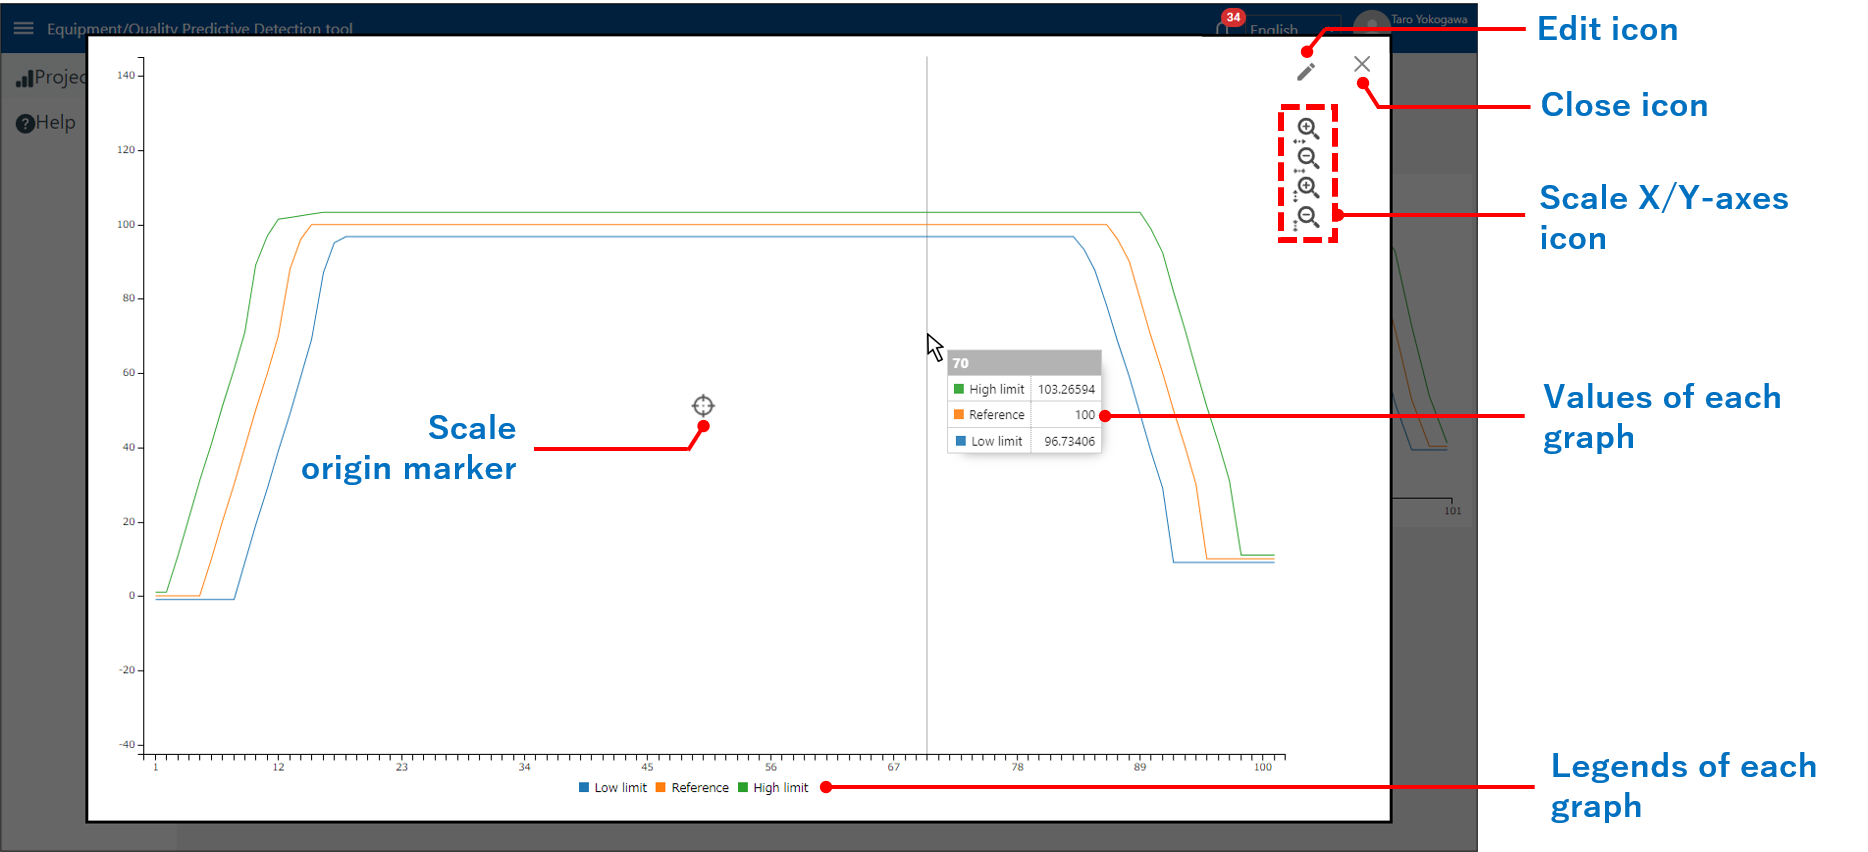
By clicking the "Scale X/Y-axes" icon on the enlarged graph screen, you can scale to X/Y-axes directions at the center of the origin marker.
The position of origin marker can be moved by clicking on the graph.
Also, you can scroll in the X-axis direction by operating the mouse wheel while enlarging to the X direction.
# Edit the Profile Trend
When clicking the "Edit" icon, it will be switched to "Edit graph" mode.
In the "Edit graph" mode, you can adjust the "Profile Trend" to the Y-axis direction and save the changes.
Even in the "Edit graph" mode, you can do the following operation.
・Display the value of each graph
・Display/hide the graphs and the values of each graph (click on the legend)
・Scaling to X/Y-axes directions
・Scrolling the display range in the X-axis direction
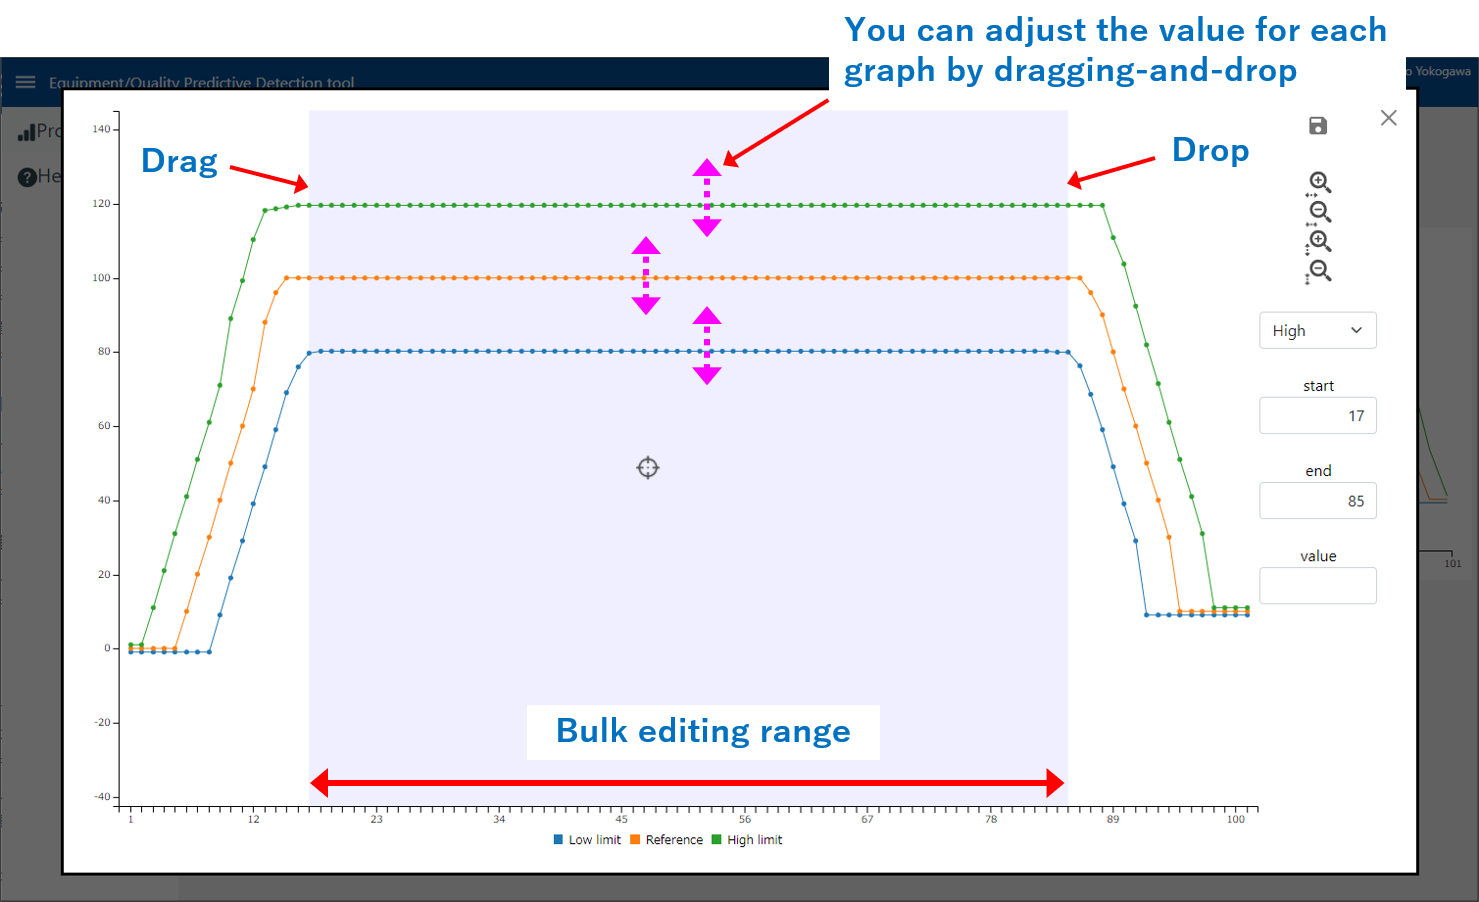
When dragging-and-drop of mouse operation each point on the graph vertically, you can adjust the value of each point to the Y-axis direction.
Also, when dragging-and-drop other than each point on the graph horizontally, you can specify the bulk editing range.
In the state of specifying the bulk editing range, you can adjust multiple points, at once, by dragging-and-drop vertically.
The adjustment of values can be performed for each High limit / Reference / Low limit value, respectively.
Note:
The value can be adjusted within the range of High limit ≧ Reference ≧ Low limit.
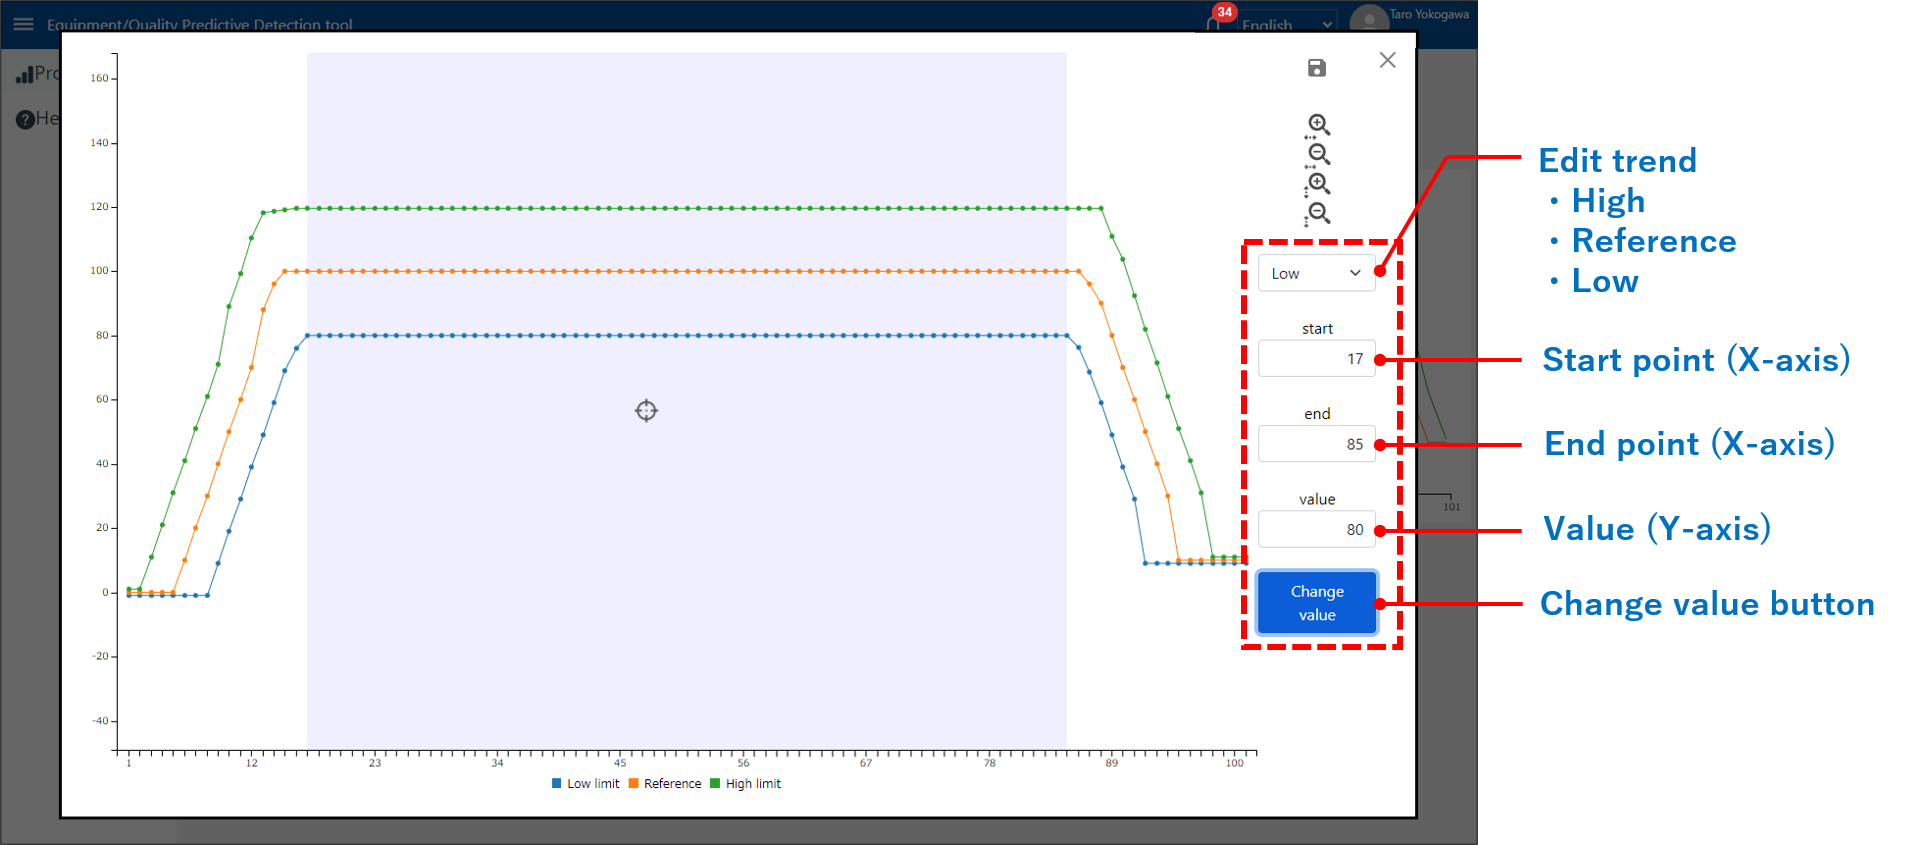
The value of "Profile Trend" can be also adjusted directly by entering the value into the input box on the right side of the screen.
Select "Edit trend (High / Reference / Low)" in the menu, enter the start/end-points and value you want to change, and click the "Change value" button.
In addition, the specifying start/end-points can be also performed dragging-and-drop of mouse operation.
After editing the "Profile Trend", by clicking the "Save" icon, it will be shown the dialog to save "Profile Trend".
By clicking the OK button, "Profile Trend" will be overwritten.

Note:
- When there are no operations that involve moving a screen for 30 minutes, a dialog will be displayed, and clicking OK, it will be moved to the logout page.
In this case, the edited "Profile Trend" before saving will be discarded, so please save frequently after editing. - When editing the "Profile Trend", the existing "Profile Trend" will be overwritten.
If you want to edit the "Profile Trend" while keeping the created "Profile Trend", please copy the project.
Please refer to here for a copy of the project.
# Download
By clicking the "Download" in the menu, you can download the created "Profile Trend".
The location for downloading depends on the setting of your browser.
Note:
The file will be downloaded as "Profile.GPF".
Please rename the file as needed before loading it to SMARTDAC+.